And finally, a UDP joke:
TCP/UDP Jokes
Reply

And finally, a UDP joke:
I just got back from this year’s OpenStack Summit, which was a great experience. In addition to many fruitful sessions about OpenStack itself, a keysigning party was held. This was the first such session I’ve attended, and the use of PKI for signing/encrypting mail is something that’s only recently drawn my interest.
One thing that I find interesting is that there’s no central authority from which keys derive trust, unlike SSL in browsers. Instead, it’s a web-of-trust model. Individuals cryptographically sign each others’ public keys to denote trust in them. If you’ve verified my key, and I sign Bob’s key saying I’ve verified it, then, if you trust me, you can trust Bob’s key.
At the keysigning party, we used the Sassman Projected Method, in which we each stood up, presented something like a passport on the projector, and verbally verified that the list of key fingerprints compiled before the event was valid. (We also verified the MD5 and SHA sums of the list itself before beginning, so that we knew we were working with the same list.)
I’m not going to cover the basics, because myriad other sources already do a much better job. But a few helpful hints for your gpg.conf:
default-key value if you have more than one key.require-cross-certification is presentYou may also want to set up a keyserver different from the default. Here is what I have:
keyserver hkps://hkps.pool.sks-keyservers.net
keyserver-options ca-cert-file=~/.gnupg/sks-keyservers.netCA.pem
keyserver-options auto-key-retrieve
keyserver-options no-honor-keyserver-url
This uses the SKS Keyservers pool, a pool of almost 100 keyservers that all exchange keys. More specifically, it selects the HKPS one, running SSL on port 443. To use this, you must grab their self-signed SSL certificate. (Note that the use of SSL is mostly to prevent a middleman from eavesdropping than tampering with your keys—that security comes through the keys themselves.)
The auto-key-retrieve option is so that when I get new email in mutt with a key I haven’t seen before, it will be fetched automatically. The no-honor-keyserver-url ensures that we always use our HKPS-enabled one, even if a key points to another server, so we ensure we stay on HKPS.
caff automates much of this. On Fedora, it’s provided by pgp-tools.
caff once to have it generate a ~/.caffrc file.~/.caffrc to taste:
$CONFIG{'owner} and $CONFIG{'email'} are set properly.$CONFIG{'mailer-send'} = [ 'smtp.corp.example.com'].caff maintains its own gpg.conf file, in ~/.caff/gnupghome/. You may want to customize it, or just symlink your main one to it. Partly because I missed exactly what was happening at first, I instead imported keys to my normal keyring, and just pointed caff to that keyring. I used -R to prevent it from fetching keys, and --key-file ~/.gnupg/pubring.gpg to pull from my normal keyring. This probably made things more difficult than needed.
One thing that took me a moment was how to look up a fingerprint. For example, if my key fingerprint is 5150 9442 00FE 3099 4CA8 D2EA E639 859C 2BE0 2E05, how do I look that up? It turns out to be simple: take the last eight characters (2BE02E05), prepend 0x, and search.
So my workflow was:
gpg2 --search-keys 0x2be02e05 # and import
caff -R --key-file ~/.gnupg/pubring.gpg 0x2be02e05 # and follow steps
Of course, be sure that the fingerprint matches, and that you’ve validated the person’s identity in real life before signing. Once you run caff, it will have you sign the key and email it to each address on file.
Being an American, I have long tended to ignore accent marks on characters from other languages, assuming they are unimportant and mostly decorative. No need to be all fancy and type résumé when “resume” works.
That ended when I tried to show off my Spanish around New Year’s, wishing someone online a “feliz ano nuevo,” only to learn that I had wished them a “happy new anus”. It turns out that the accent mark is quite important in differentiating “ano” (Spanish for ‘anus’) from “año” (Spanish for “year”). Ever since, I’ve accepted that, while more difficult to type, it’s important to use the right characters.
I’m now taking Czech lessons at work, and wish to make sure that I don’t embarrass myself again. The Czech language has a lot of accented characters. But switching to the Czech keyboard layout is awfully confusing.
Thanks to Tomas for introducing me to the concept of the “Compose” key in Linux, allowing you to type
To enable the Compose key on Fedora 20 (in GNOME): Open the Settings menu and select ‘Keyboard’. From the Shortcut tab, find ‘Typing’, and you can now choose a key to map the Compose Key to.

I chose the right Alt key, because I don’t use it.
To use it: Press your Compose key and release it. (You don’t have to hold it down.) Press a key corresponding to the accent, then the letter it should go over. For example, ñ is Compose, “~”, then “n”.
Here is an exhaustive list of possible characters, but here is a quick list of some common modifiers:
Remember, you don’t have to hold down the Compose key. Just tap it, then type the next character. I keep forgetting this and doing weird gymnastics trying to type.
There are many more characters you can type, like ə, Đ, ç, ø, plus some currency signs and numeric super/subscripts, but I’ll let you view the full list to find them.
Now, typing čeština is easy! Understanding it will still be a long battle for me, but I can type it!
I thought I’d post about the Zalman VE400 I’ve been using for a while now. The basic idea is that it’s a USB disk enclosure for a 2.5″ drive, but with a twist—it has a small LCD and keypad on the front, allowing you to create a directory of .iso files and pick one to export as a virtual CD/DVD. (It also supports some sort of hardware encryption, which I haven’t tried.)
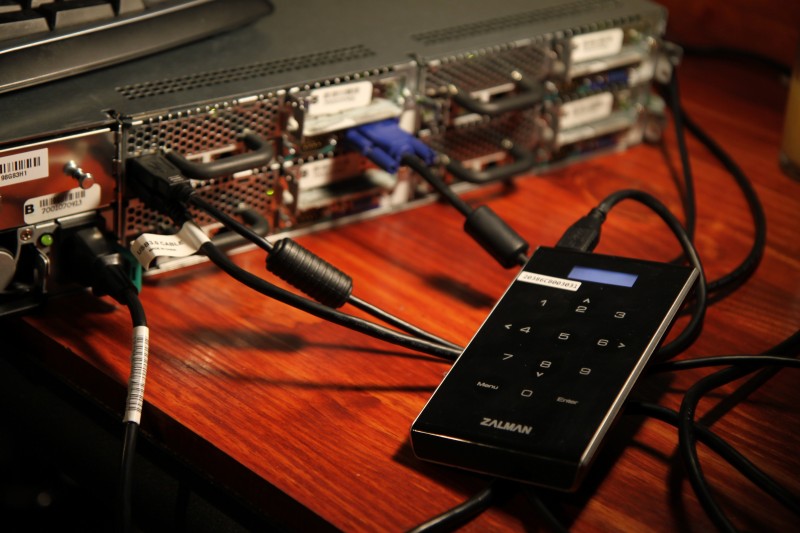
I bought mine, along with a 120GB SSD. Installing the drive is quite easy. Just remove a couple screws on the enclosure, slide the disk into place (it’s literally that easy), and put it back together.
Rather than an extended narrative, I’ll do bullet points for the pros and cons.
Where to start…

I gave this a 3-star rating on NewEgg, where the average rating is a 2-star review. My opinion has not improved.
However, I would buy this again if I lost it. Despite its many flaws and quirks, I’m yet to find anything else that offers the same functionality.